

Start by Figuring Out What Kind of Scratch You Have
A scratch across a hardwood floor can stand out immediately, especially when sunlight catches it or the mark runs through an otherwise clean section of flooring. The good news for Arnold homeowners is that not every scratch means the floor needs to be sanded and refinished.
Many marks affect only the protective finish sitting above the wood. Others reach through the finish and into the stain or actual wood fibres. Knowing the difference helps you choose a repair that improves the floor instead of making a small problem more noticeable.
For homeowners who want help assessing existing floors, Flooring Galaxy provides knowledgeable flooring guidance and hardwood refinishing services for Arnold and the greater St. Louis area.
Before reaching for a marker, sandpaper, polish, or repair kit, take a close look at the damage.
A hardwood scratch usually falls into one of three general categories:
Surface scuff or micro-scratch: A light mark affecting primarily the protective finish.
Deeper scratch: A visible line that has penetrated the finish and may expose stained or unstained wood.
Gouge or significant damage: A deeper indentation, chipped area, exposed wood, or damage affecting the board itself.
The National Wood Flooring Association (NWFA) notes that most scratches occur in the floor finish rather than the actual wood, and minor surface scratches can often be touched up. Larger repairs are better evaluated by a flooring professional.
That distinction is important because the best DIY fix for a superficial scratch could be the wrong approach for a deep gouge.
Clean the Area Before Trying to Repair It
Sometimes what looks like a scratch is actually a scuff, dirt line, heel mark, or residue sitting on top of the finish.
Cleaning first gives you a clearer view of the damage and prevents grit from being rubbed into the floor while you work.
Remove Loose Dirt and Grit
Begin by gently sweeping, dust mopping, or vacuuming the area using a setting suitable for hardwood.
Dirt and small particles can act like abrasives. If you start rubbing a repair product over gritty flooring, you may create additional fine scratches around the original mark.
The NWFA recommends routine sweeping, dust mopping, or vacuuming with a bare-floor setting and advises cleaning spills promptly with a dry or slightly damp cloth.
Use a Cleaner Made for Your Floor
After removing loose debris, clean the affected area using a product appropriate for the floor's finish.
Avoid soaking the boards. Excess moisture can work between seams and affect wood over time. Wet mops and steam mops are also discouraged for wood-floor maintenance by the NWFA.
Once the area is clean and completely dry, examine the mark again from several angles.
If it disappears, you were dealing with a surface mark rather than a scratch. If you can still see or feel a line, move on to identifying its depth.
How to Tell Whether the Scratch Is in the Finish or the Wood
Run a fingertip gently across the damaged area.
If you can barely feel the mark and the wood colour underneath appears unchanged, the damage may be limited to the finish.
If your fingernail catches noticeably in the line, or the scratch reveals a different colour underneath, it has probably gone deeper.
Light Surface Scratches
These often appear as fine white or dull lines, particularly when viewed against reflected light.
The wood itself may still be completely protected.
Scratches Through the Colour Layer
If the line looks much lighter than the surrounding floor, the damage may have penetrated the stain or factory-applied colour.
Matching the repaired area becomes more important at this stage.
Deep Scratches and Gouges
If wood fibres are torn, a noticeable groove has formed, or the damage includes a dent, you are no longer dealing with a simple cosmetic surface scratch.
Deep scratches, dents, exposed bare wood, and widespread damage are signs that professional repair or refinishing may provide a better result. The NWFA recommends a full sand and refinish when substantial damage reaches the wood or the finish has worn away enough to expose bare flooring.
DIY Fixes for Minor Surface Scratches
If the scratch is truly superficial, you may be able to improve it without sanding the floor.
The safest approach is to use maintenance or repair products that are compatible with the existing finish.
Try a Manufacturer-Approved Touch-Up Product
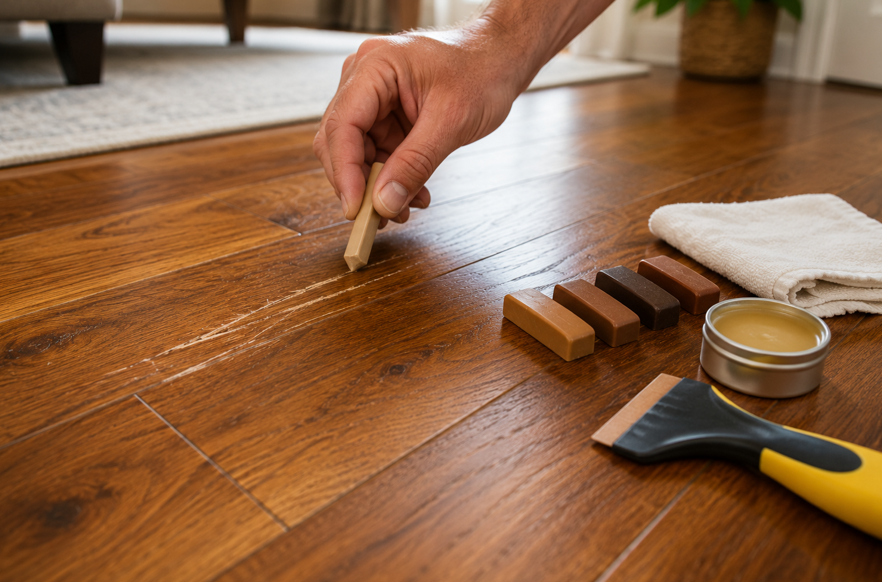
Touch-up markers, stain pens, and wood-floor repair kits can help disguise minor scratches. The NWFA specifically identifies these types of products as useful for small surface repairs.
Choose a colour that closely matches the surrounding floor rather than automatically selecting the darkest shade in the grain.
When colour matching, consider that hardwood boards naturally contain variation. A repair that is slightly lighter is sometimes less noticeable than a dark line sitting across the grain.
Test any colouring product in an inconspicuous location before applying it to a prominent area.
Consider a Compatible Polish for Micro-Scratches
Some finished hardwood floors can benefit from an approved polish or refresher when the damage consists of very fine scratches spread across the surface.
Bona, for example, advises that polish can help with smaller micro-scratches on certain lacquered wood floors, while deeper scratches call for professional assistance.
That does not mean every hardwood floor can accept the same polish. Factory finishes, site-applied finishes, penetrating oils, waxed floors, and other systems have different maintenance requirements.
Check the flooring or finish manufacturer's instructions before applying anything across a larger area.
Be Careful With DIY Sanding
Sandpaper sounds like an obvious solution to a scratch: remove a little material, smooth the mark, and add colour back.
On a finished hardwood floor, it is rarely that simple.
Sanding one isolated spot can change the sheen, remove stain, expose lighter wood, or create a visible low area. The repair may end up attracting more attention than the scratch did.
This is especially important with prefinished flooring, where factory-applied coatings can be extremely durable and difficult to reproduce locally.
If you are unsure whether your floor is solid hardwood, engineered hardwood, factory finished, site finished, oiled, or coated with another finish system, avoid aggressive spot sanding until the floor has been identified.
Homeowners considering repairs or a larger update can explore hardwood flooring options while also discussing whether an existing floor is better suited to touch-up, recoating, refinishing, or replacement.
When Light Sanding May Be Appropriate
Certain oiled wood floors can allow localised repair methods that include very fine sanding followed by reapplication of the same oil system.
For example, Bona's maintenance guidance for oiled floors describes very fine sanding as an option when a scratch remains visible after cleaning and refreshing, followed by application of the same oil previously used.
That advice is specific to compatible oiled systems. It should not be transferred automatically to polyurethane-coated, factory-finished, or otherwise sealed hardwood.
Avoid Popular Household “Scratch Repair Hacks”
The internet is full of suggestions for hiding hardwood scratches with cooking oils, vinegar mixtures, mayonnaise, wax crayons, permanent markers, coffee grounds, or nuts.
Some of these may temporarily darken a mark, but temporary camouflage is not the same as a compatible floor repair.
A hardwood finish is a protective system. Applying an unknown oily, acidic, waxy, or colouring substance can change the sheen, leave residue, interfere with future coatings, or make professional repair more involved.
A safer rule is simple: use products designed for the type of wood-floor finish you actually have.
The NWFA recommends using cleaning and maintenance products intended for the floor's finish and warns that inappropriate products can damage the finish or wood.
If you inherited the floor with the house and do not know what finish is on it, getting professional guidance before trying a home remedy can save you from creating a larger visible patch.
What to Do About Pet Scratches
Dogs are one of the most common reasons homeowners notice fine scratches developing in high-traffic areas.
You may see them near exterior doors, around food bowls, along a dog's favourite running path, or in spaces where pets turn quickly on the floor.
For minor pet scratches, begin with the same approach used for any light surface damage:
Remove dirt and grit.
Clean the flooring with a compatible wood-floor cleaner.
Let it dry.
Assess whether the marks are limited to the finish.
Use an approved touch-up, polish, or maintenance product if appropriate for that finish.
Bona advises that small micro-scratches on certain lacquered floors may respond to an appropriate polish, while deeper pet scratches are better assessed by a flooring professional.
Prevent the Next Round of Scratches
Keeping pet nails appropriately trimmed can reduce scratching. The NWFA also recommends breathable rugs at entry doors to minimise dirt and debris tracked onto wood flooring.
The rug itself needs to be suitable for your floor. Some backings can trap moisture or react with certain finishes, so follow the flooring manufacturer's recommendations.
Repairing Furniture Scratches and Scuffs
Moving chairs, tables, sofas, and other furniture can leave anything from faint surface lines to deep grooves.
If the furniture has merely left a dark scuff, start with approved cleaning rather than assuming the finish has been cut.
If the line is a true scratch, use the depth test before deciding on a repair.
Add Floor Protectors
Once the mark has been addressed, protect the legs of furniture that contacts the floor.
The NWFA recommends floor-protector pads beneath furniture to help prevent scratching. It also advises avoiding sports cleats and high heels that can damage wood flooring.
Check pads periodically. Felt can pick up grit, and a dirty protector can become abrasive rather than protective.
For frequently moved chairs, replacing worn or contaminated pads can make a noticeable difference.
When a Recoat Makes More Sense Than Spot Repairs
What if your Arnold hardwood floor does not have one obvious scratch, but hundreds of tiny ones?
At some point, treating individual marks stops being practical.
If the floor looks dull and has widespread superficial scratching but the wood itself remains in good condition, a professional maintenance coat or recoat may restore the appearance without taking the flooring all the way back to bare wood.
The NWFA describes a maintenance coat as cleaning the existing finish, lightly abrading it, and applying a fresh coat of wood-floor finish. It can be appropriate when floors have become dull or have minor surface wear.
Bona similarly describes professional recoating as a method for addressing superficial scratches and scuff marks while adding a new protective layer.
A recoat and a full refinish are not the same service. Choosing between them depends on how deeply the damage extends and whether the existing finish is suitable for another coat.
When Hardwood Refinishing Is the Better Repair
Some scratches go beyond what a marker, polish, or maintenance coat can reasonably correct.
Professional refinishing may make more sense when:
Deep scratches extend into the actual wood.
Numerous rooms show widespread damage.
Bare wood is exposed.
The existing finish has worn away.
There are deep dents or gouges.
You want to repair damage while also changing the floor colour.
Previous DIY repairs have created uneven colour or sheen.
A full sand and refinish removes the existing finish and gives the floor a new surface treatment. The NWFA recommends this approach for deep scratches, dents, significant floor damage, or areas where the protective finish has worn away and exposed the wood.
Not every hardwood floor can be sanded an unlimited number of times. The number of possible refinishes depends on factors such as the floor's construction, wear-layer thickness, condition, previous sanding, and the skill of the contractor.
That is another reason an assessment can be valuable before an aggressive DIY repair.
Preventing Hardwood Scratches in an Arnold Home
Repairing scratches is useful. Preventing avoidable ones is even better.
Arnold households deal with normal family traffic throughout the year, including shoes, pets, furniture movement, outdoor grit, and seasonal changes in indoor conditions.
A few habits can make hardwood easier to maintain.
Keep Dirt From Becoming an Abrasive
Sweep, dust mop, or vacuum regularly so grit does not sit on the floor and get dragged under shoes, pet paws, chairs, or cleaning tools.
Use Mats at Exterior Doors
Good entry mats help catch moisture and particles before they travel through the home.
Add Furniture Protection
Place compatible protector pads beneath chair, table, sofa, and furniture legs.
Lift Rather Than Drag
When moving heavier furniture, lift it with appropriate help or use a floor-safe moving method rather than pulling it directly across hardwood.
Maintain Comfortable Indoor Conditions
Wood responds naturally to humidity changes. The NWFA recommends maintaining indoor conditions around 60–80°F and 30–50% relative humidity throughout the year to minimise excessive seasonal movement.
Think About Sheen When Refinishing
If visible scratches are a recurring concern, finish sheen can influence how noticeable everyday wear appears.
The NWFA notes that lower-sheen finishes reflect less light and generally make small scratches and normal wear less noticeable than glossier finishes.
That can be worth discussing if you are already planning to refinish an active family room, hallway, or pet-friendly space.
Know When to Put Down the DIY Repair Kit
Minor scratches can often be managed at home, particularly when they are limited to the finish and you know which maintenance products are compatible with the floor.
But there is a point where continued experimenting can cost more than getting the floor assessed properly.
Consider professional help if:
You cannot identify the finish.
The scratch exposes bare wood.
A large section is damaged.
Boards are chipped, cracked, or deeply dented.
The colour is difficult to match.
Previous repair products have left visible patches.
The floor has widespread wear rather than one isolated scratch.
You are considering sanding.
The floor may need recoating or refinishing.
Professional repair is not necessarily about replacing the floor. Depending on its condition, an experienced flooring specialist may recommend a targeted repair, maintenance coat, refinishing, or another approach that preserves the hardwood already in your home.
Keep Your Arnold Hardwood Floors Looking Their Best
A scratch does not automatically mean the end of a beautiful hardwood floor.
Start small. Clean the area, determine how deep the damage goes, identify the floor finish when possible, and choose a compatible repair method. Fine surface scratches may respond to touch-up products or finish-specific maintenance, while deep gouges and widespread wear usually deserve professional attention.
Avoid aggressive sanding and household repair hacks unless you know they are appropriate for the exact flooring and finish. A small visible mark is often easier to address than a large patch created by an incompatible DIY treatment.
Regular cleaning, floor protectors, entry mats, pet nail care, careful furniture movement, and sensible indoor humidity can also reduce the number of scratches that develop in the first place.
Flooring Galaxy serves Arnold homeowners from its showroom at 2120 Tenbrook Rd, Arnold, MO 63010, and offers hardwood refinishing along with professional flooring installation and repair-related expertise.
If scratches have moved beyond a simple touch-up or you want to find out whether your existing hardwood can be refreshed, reach out to us for personalised guidance from the Flooring Galaxy team.


